What Is Cache On Kodi ?
When you play movies, tv shows and other videos over Kodi add-ons they usually play brilliantly. However, all add-ons require a pre-buffered amount of data to make sure that your videos don’t pause every second. Kodi saves this video buffer in the RAM, using the 20MB that is allocated to all its add-ons by default.
Sometimes, to cover high quality buffering addons override default settings and save buffered data on your hard drive. Well and good for high spec devices, but low spec devices tend to display messages like “Cache is full, empty your Cache.” This leads to slow video playback and buffering when you play high quality videos.
There is no harm in clearing up the default cache to fix kodi not working, as it frees up space allowing other add-ons to use it to create buffer for video playback, giving you an excellent streaming performance. Kodi will at one point automatically clear the video cache in case it needs the space for its add-ons.
So, let’s go ahead and discover how to remove (clear) cache in Kodi. I will demonstrate the method to clear cache on Kodi XBMC Krypton and Jarvis using the best VPN for Kodi.
How to Clear Cache on Kodi Guide
- How To Clear Cache – Video Guide Tutorial
- How to Clear Cache on Kodi Using Direct Method
- How To Clear Cache in Kodi Jarvis Version 16
- How To Clear Cache in Kodi Krypton Version 17
- How to Clear Kodi Cache Using Ares Wizard (Not Working)
- Clear Cache in Kodi Exodus
- How To Clear Cache in Kodi Firestick
- Clear Cache in Kodi Covenant
How to Clear Cache Automatically in Kodi Krypton 17 Using Super Repo (Fix Buffering Issues Caused by Full Storage)
Update: Merlin wizard is not working anymore through its old source and obviously all the users are a bit worried. Well, there’s a clear-cut solution everyone! You can use Super Repo; the famous repo package, to install Merlin Wizard or browse through best kodi wizards section.
To clear cache Kodi users can totally rely on Super Repo. Here’s a step by step guide for Super Repo installation and Cache clearing process.
- Open Kodi > Click on Settings icon (located at the top) > Go to File Manager > Then double click Add Source.
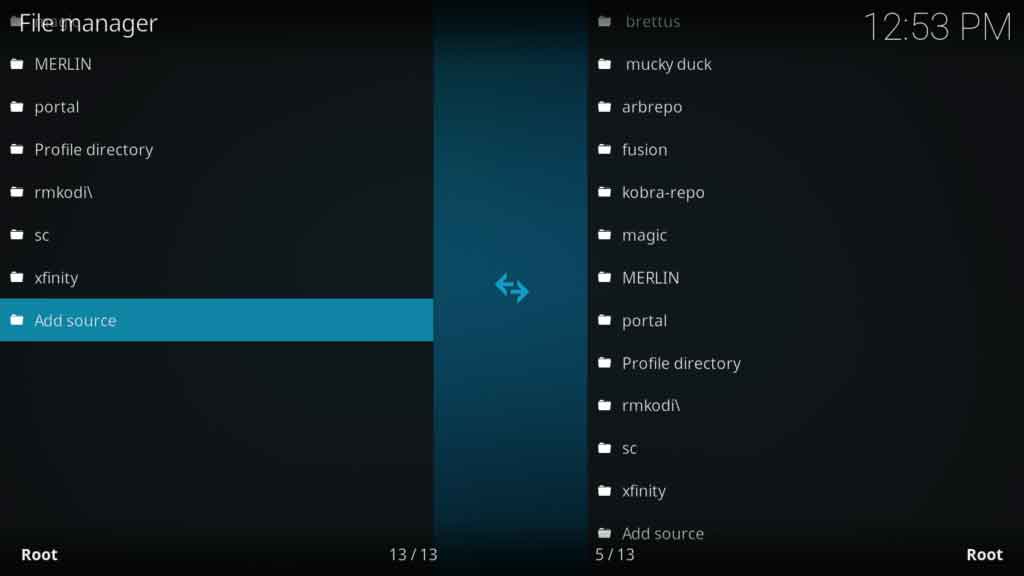
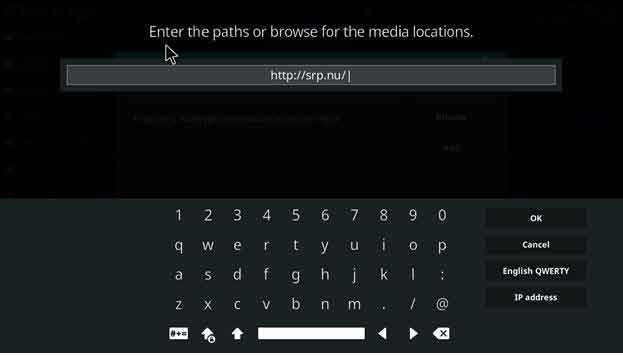
- Click where it says ‘None’ > Type the URL > Click OK > Type the Media Source name ‘Superrepo’ > Click OK.
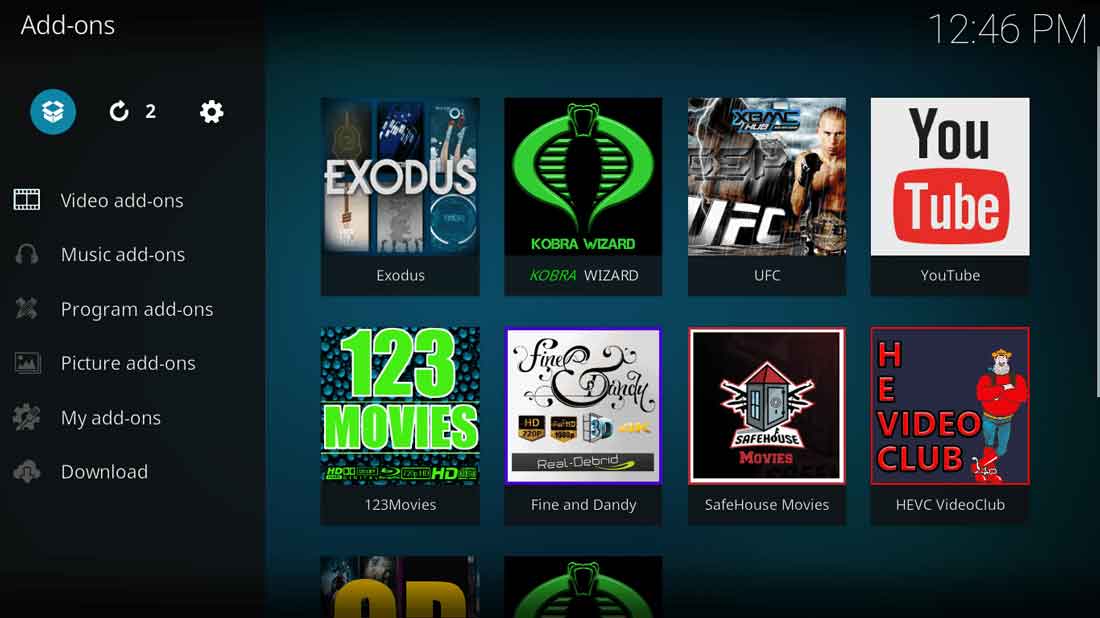
- Click ‘Backspace’ key multiple time to go back to Kodi Main Menu > Now click on Add-ons > Then click on Package Installer icon (Located at top left corner) .
- Select Install from Zip File > Click superrepo > Then click on Krypton > Repositories > Superrepo.
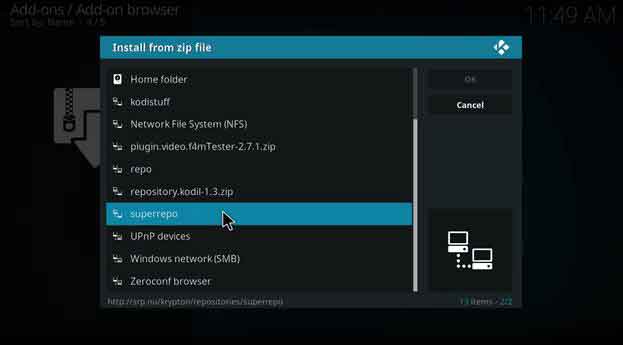
- Click ‘superrepo.kodi.krypton.repositories-0.7.04.zip’ and wait for the zip file to be installed.
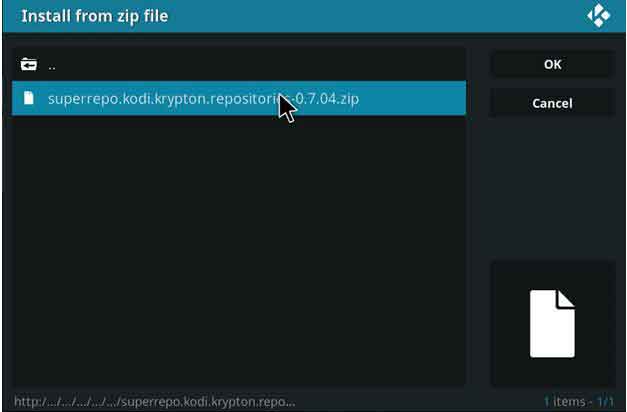
- Now select Install from Repository > Select SuperRepo Repositories [Krypton] [V7] > Add-on Repository > Select SuperRepo All [Krypton [V7] > Click Install > Wait until the add-on is enabled.
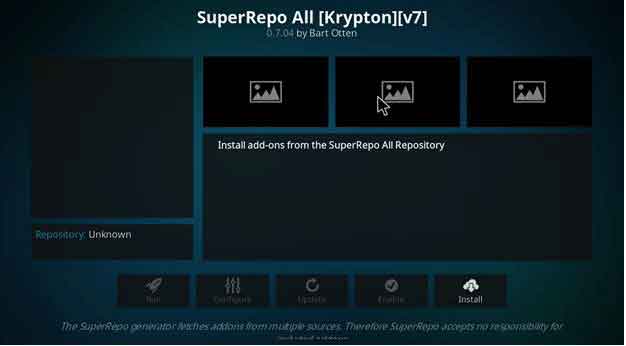
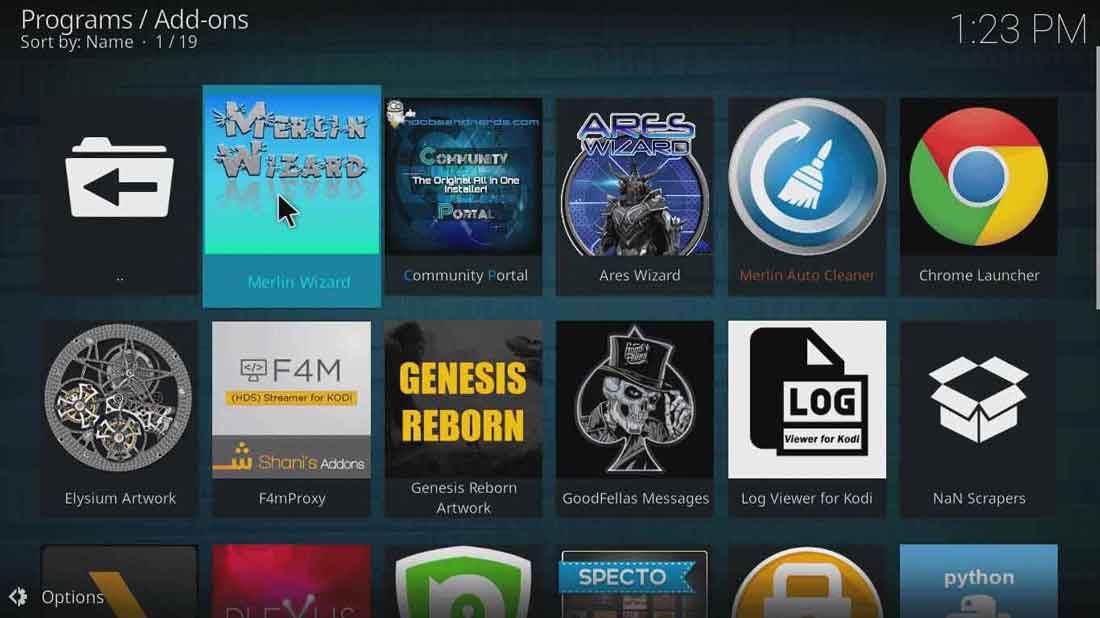
- Go back to Add-ons> Click the Box icon> Click on Install from Repository> Click SuperRepo All [Krypton] [v7] > Program add-ons >Click Merlin Repository > Now click on Merlin Wizard (Sometimes Merlin Wizard box appears itself, you just have to click Open Merlin Wiard from that box).
- Go to Tool Box option located in the above menu > At the bottom you will see various options, but the most important ones are the 3 options i.e. Clear Caches, Delete Packages, and Delete Thumbnails. Below each of these options will carry a space that each carries. Click on all of these 3 options to free unnecessary space.
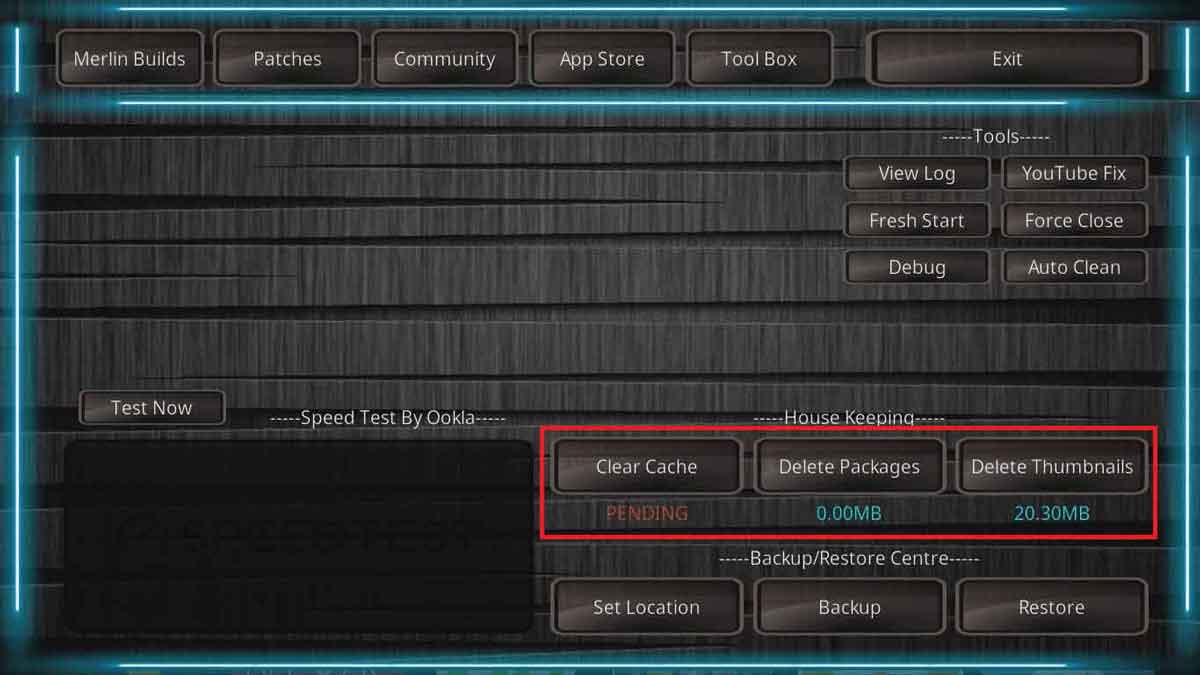
- Click on Exit once you have cleared Cache, deleted Packages, and deleted Thumbnails.
Congratulations you have successfully cleared your Kodi cache, enjoy pause free video playback. Do remember that video streaming also depends on a number of factors including you internet connection, your WI-FI connection, ISP throttling etc.
How to Clear Kodi Cache Using Ares Wizard (Not Working)
Another trustable repository that you can use to clear Kodi cache is Ares wizard. This add-on is amongst the few highly recommended third-party add-ons. Follow these steps to Install and clear Kodi cache:
- Open Kodi application> Click on the Gear (Settings) icon present in the top menu> Click on File Manager.
- Click Add source> Click <None>. Enter the URL http://areswizard.uk/ and click OK.
- Name this source ‘Ares’> click OK> Click OK again.
- Click Add-ons> Click the Box Icon top of the left hand column.
- Click on Install from zip file> Click on Ares> Click on “repository.aresproject-0.1.0.zip”
- Wait for the notification> Click on Install from repository.
- Click on Ares Project .
- Now go to Program add-ons> Choose Ares Wizard > Press Install.
- Open Ares Wizard once installed.
- Go to Maintenance option on top menu> Now click on Delete Cache\Delete Packages/Delete Thumbnails > Cache will be Deleted.
That’s it! Simple, not so complicated.
How To Clear Cache – Video Guide Tutorial
How to Clear Cache in Kodi Jarvis Version 16 or Below
- Open Kodi Jarvis > Then click on System menu in front of your screen > Now select File Manager > Double click Add Source option at the bottom.
- Once you click on Add Source, a box will soon appear where you need to click on ‘None’ option and type http://srp.nu/ > Click Done > Type URL Name below ‘Super Repo’ > Click Done > Then click OK.
- Once you are done, go back to Kodi Main Menu by pressing ‘Esc’ button on your keyboard > Go to System > Then select Add-ons > Then click on Install from Zip File > Super Repo > Then select Jarvis > Click on Repositories > Superrepo > superrepo.repo.0704.zip
- Now select Install from Repository > Then Super Repo Repository [Jarvis][v6] > Go to Add-on Repository > Select SuperRepo All Repository [Jarvis][v6] > Hit Install
- Go back two steps and click on Install from Repository > SuperRepo All Repository [Jarvis][v6]> Program Add-ons > Merlin Wizard > Install
- Open Merlin Wizard, go to Tool Box option > Here you will presented with 3 options i.e. Clear Caches, Delete Packages, and Delete Thumbnails. The space that each of these options consume are also listed below these options.
How To Clear Cache Kodi on Covenant
Covenant, the so called fork of Exodus is usually preferred by Kodi users for streaming movies and TV shows. Since Exodus became obsolete, Covenant has captured the limelight. Despite this fact, to clear cache Kodi users can rely on it.
If you want to clear cache Kodi, users may need to install Covenant add-on first. For Installing the Covenant on Kodi, check this installation guide.
Here is a step by step walk through for you to clear cache once you’ve installed covenant:
- Open Kodi> Go to add-ons> Go to Video Add-ons> Open Covenant.
- Go to the Main Menu> Open Tools.
- Now click on Clear Cache and Clear Provider> Click Yes> A notification ‘Process complete’ will appear.
There, easy way to clear cache for Kodi users. Enjoy.
How To Kodi Clear Cache By Using Direct Method Manually
For Kodi clear cache process, you’ll need a repository. Otherwise you cannot clear cache in Kodi. If you want a direct method then here’s a brief guide for you:
Follow these steps in Kodi to clear cache:
- Download Super Repo Zip File on your device.
- Open Kodi > Click Add-ons> Click on Box-shaped icon on top-left corner.
- Select Install from Zip File > Here you need to Navigate the downloaded Zip File > It will take some time to install.
- Click Install from Repository> Select SuperRepo Repositories [Krypton] [V7].
- Click Add-on repository.
- Click SuperRepo All [Krypton [V7] .
- Click on Install > Wait for the add-on to be installed.
- Open Add-ons menu> Click on the Box icon.
- Click on Install from Repository> Click SuperRepo All [Krypton] [v7] > Click Program add-ons.
- Click Merlin Repository > Select Merlin wizard from the list> Click Install.
- Open Program Add-ons > Select Merlin wizard> Go to Tool Box > Click Clear Cache.
Now you can enjoy swift streams without any lagging. Enjoy!
How to Clear Cache on Exodus Kodi Addon
Video buffering in Exodus add-on can sometimes take ages which could be very frustrating. You may feel less interested in watching movies and TV shows when it buffering takes a lot of time. However, you can overcome these obstacles by clearing cache on Kodi Exodus. Here are the steps to follow:
- Once you have installed Exodus on Kodi, go to Kodi Main Menu
- Go to Add-on > Video Add-ons > Click on Exodus.
- Here you will see many options including Movies, TV shows, but you have to click on Tools option.
- Now look at the bottom you will find two options i.e. Exodus: Clear Providers and Exodus: Clear Cache. Click on both of these options and clear everything. You can now watch buffer-free video.
This solution would work perfectly for your Exodus add-on. However, Exodus will soon disappear since its replacement has already been introduced i.e. Covenant. Here is the process to install Covenant on Kodi.
How to Clear Cache in Kodi FireStick
Like the Windows, Mac, and Android versions you can use the same step by step methods listed above to clear the cache in your Kodi for FireStick also. Since the Amazon FireStick has limited storage, it is good to routinely clear the cache on the device.
Just to be sure, also check your FireStick’s connectivity with the router and then clear the cache in FireStick following the same steps as instructed above.
See You Again Soon
Hope you found my how to remove cache in Kodi guide helpful & your streaming issues worked out fine. Check out our blog and guides sections for more interesting add-ons, configuration guides, troubleshooting and unblocking solutions for Kodi.
As for the users using Kodi on Firestick, try using a free VPN for Kodi Fire stick to unblock the geo-restricted streams and to protect your privacy.


86 Responses to How to Clear/Remove Video Cache in Kodi XBMC (Leia/Krypton/Jarvis)