Kodi is a free open-source software that can be downloaded on your Raspberry Pi device and with it you can watch movies, TV shows, live sports, and everything your heart desire. With 6 easy steps you will be able to know how to install Kodi on Raspberry Pi and your Kodi will be up and running in no time. The installation process of Kodi is different for Raspberry Pi First Generation, while installing the best VPN for Kodi on raspberry Pi is a bit tricky method which happens using Zomboided repository.
How to Install Kodi on Raspberry Pi
- Things needed to setup Raspberry Pi for Kodi v17.6
- How to Install Kodi on Raspberry Pi 1 in 6 Steps
- How to Install Kodi on Raspberry Pi 2
- How to Install Kodi Krypton v17.6 on Raspberry Pi 3
- How to Install Kodi on Raspbian
- How to Install VPN on Raspberry Pi to use Kodi
- Raspberry Pi Kodi Download
- Raspberry Pi Kodi Alternatives
Things needed to setup Raspberry Pi for Kodi v17.6
Before you jump on to the installation of Kodi on Raspberry Pi, let me tell you about the things that you will need to setup Raspberry Pi. Following peripherals are required for setting up Raspberry Pi:
1. Raspberry Pi device
It is obvious that without the device itself you cannot proceed further. Make sure you buy an up to date Raspberry Pi model, so that you do not get to face any issues related to hardware or OS compatibility.
The older the Raspberry Pi boards get, their performance starts declining. This is why I recommend users to either optimize their boards or buy the latest Raspberry Pi model.
2. The Flirc Raspberry Pi case
The Flirc Raspberry Pi case is not an essential need but it is a good thing to have if you plan on binge watching. The reason behind this recommendation is that a Flirc Raspberry Pi case comes with a built-in heat sink, which prevents the board from overheating.
Many users have reported overheating issues and this happens usually because when you are streaming for hours, the board’s performance is fully utilized. Overheating may cause many hardware issues and sometime it can result in a short circuit.
Another reason to opt for a Flicr case is that it gives a great look to your board because of its cool aluminum body. You can keep the board overlocked without worrying about the overheating issues and your board gets a great new look as well.
3. Ethernet cable
A high-speed Ethernet cable is necessary to have, not just for connecting your device to the internet but for also having good bandwidth speed for uninterrupted streaming.
4. HDMI cable
For connecting your Raspberry Pi device to your TV, you will need a HDMI cable. An HDMI cable works better than screen casting because of it does not provide a delayed visual.
5. MicroSD memory card
An external storage is necessary for storing media files on Raspberry Pi. Many users opt for USB drives, which are not fast enough for pulling media files, and sometimes they slow down the system. Using a micro SD card is always a better option than a USB stick.
However, Raspberry Pi does not support every micro SD card. You might a micro SD card along with your Raspberry Pi in the package; check the card well because many a times these cards are of low quality.
You would see Samsung and Kingston cards coming in the packages with Raspberry Pi devices, which are not that efficient. It is better that you use SanDisk cards and that too should be at least 16 GB, to ensure smooth operating experience.
6. Micro USB power adapter
Power adapters are not included in the package when you buy a Raspberry Pi board, which is why you have to buy them separately. Make sure you buy a high-quality power adapter supported by your device because sometimes there are packages offering a few low-grade power adapters along with the Raspberry Pi boards. Such boards do not last long and can damage your board in case of voltage fluctuations.
How to Install Kodi on Raspberry Pi 1 in 6 Steps
- Open your browser and visit OpenELEC website > Click on Downloads > Scroll down to Raspberry builds. There are separate builds for Raspberry Pi 1, 2, 3, or Zero. Select Raspberry Pi First Generation build (Disk image file) > Download the zip file onto your device.

- Once the zip file is downloaded, extract the zip file on your device.
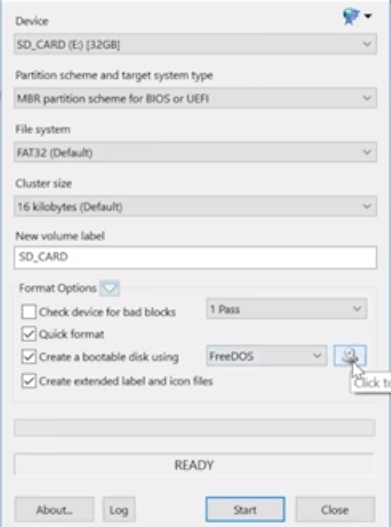
- Now we need to copy the extracted file onto a micro SD card, and for that we need a software called Rufus that creates bootable USB drives. Download the file from the link presented Here.

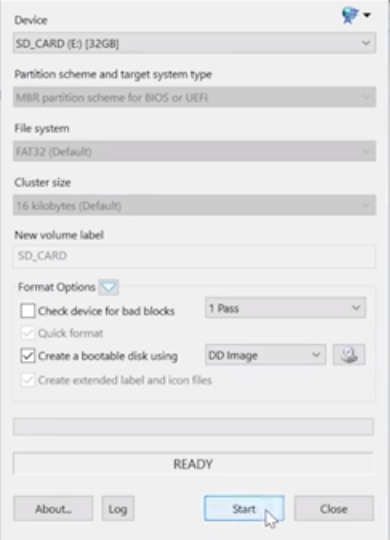
- Once downloaded, open Rufus > A box will appear that will require information > Select your SD card from the device option > Click on Disk image located on the box.

- Now browse for the file that was extracted and select the particular file > Hit the Start button on the box. The file will be written on the SD card.

- Now remove the SD card and put it back on your Raspberry Pi device. Once the Raspberry Pi device is powered ON, it will automatically boot in to Kodi. Enjoy using Kodi on Raspberry Pi.
How to Install Kodi on Raspberry Pi 2
To install Kodi on Raspberry Pi 2, except for the first step the entire process will remain the same. Open your browser and visit OpenELEC website > Click on the Download tab located at the top > Scroll down to Raspberry Pi builds > Now select Raspberry Pi 2 (Disk image file) and Download the zip file onto your device > Now Continue with step 2 from the above-mentioned guidelines as described for Raspberry Pi First Generation.

How to Install Kodi Krypton v17.6 on Raspberry Pi 3
- Download the latest version of OSMC Raspberry Pi Installer from their official website i.e. https://osmc.tv/download/.

- Plug-in the the SD-Card for installing Kodi and execute the OSMC Installer.

- Select your preferred language > Select Raspberry Pi 2/3 from the drop down list underneath the language box.

- Now, choose the version of the build you want to install > The optimal choice is to choose the latest build version because it works better.

- Now choose SD card as the storage media.

- If you are using an Ethernet cable then select Wired Connection or if you are using a Wi-Fi connection then select Wireless.

- Make sure that the storage path mentioned is correct.

- Check mark the license agreement disclaimer and the download will start.

- As soon as the installation completes, OSMC will be installed on your SD card.

- After the OSMC is installed on your SD card, you can use this SD card on your Raspberry Pi.

- Plug in your SD card in your Raspberry device and connect all the peripherals in their respective ports.

- The system will boot up and the installation will be completed.

How to Install Kodi on Raspbian in 9 Steps
Raspbian is a free operating software for Raspberry Pi device. It is the leading operating system for Raspberry Pi and most commonly used for the device.
- Install Raspbian Jesse on Raspberry Pi website and open Raspbian once it is installed.
- Go to Menu > Preferences > Click on Raspberry Pi Configuration.
- Click on Expand the File System.
- Now click on Performance tab. If you have Raspberry Pi 1 then you need to select GPU Memory of 128, while you can select 256 GPU Memory for Raspberry Pi 2 and 3. Click YES for Reboot.
- Now we need to install Kodi on Raspbian. For this, you need to make sure that you are connected to internet Wi-Fi or Ethernet.
- Click on Terminal icon located at the top > Now copy ‘sudo apt-get update’ exactly and paste it on Terminal > Press Enter > Kodi will take few minutes to install.
- Once the installation is completed, copy ‘sudo apt-get install kodi’ exactly > Press Enter.
- Type Y if it asks for you to continue with the installation on the Terminal > Press Enter.
- Now Go to Menu > Sound and Video > Kodi Media Center > You’re good to use Kodi, Enjoy!
How to Install Raspberry Pi VPN on Kodi Krypton Version 17.6
Installing Raspberry Pi VPN is a not a walk in the park for beginners, but we will discuss in detail on how you can install Raspberry Pi VPN on Kodi Krypton Version 17 in 8 steps. Before you start installing Raspberry Pi VPN on Kodi, you need to create a Raspberry Pi VPN account with any service and then follow the steps below:
- You need to have a USB flash drive inserted onto your computer.
- Download Zomboided Repository from Here.
- Transfer or copy the Zomboided Repository to USB flash drive.
- Unplug USB from computer and plug it onto your Raspberry Pi device.
- Go to Porgrams > Add-ons > Get more > Select ellipses ‘…’ Select Ellipses again > Select Install from Zip.
- Choose the USB flash drive option from the list > Select repository.zomboided.plugins-1.0.0.zip > The repository will take time to install.
- Go to Add-ons page again > Click on Install from Repository > Select Zomboided Add-on Repository > Click on VPN Manager for OpenVPN > Click on Install.
- Go to Kodi Home Screen > Add-ons > Program Add-ons > VPN Manager for OpenVPN.
- A box will appear where you will need to select your desired Raspberry Pi VPN Service > Insert Username and Password > Enjoy.
Make sure you are not signing up or thinking about trying a free VPN for Kodi because they are not reliable and they are not compatible with Raspberry Pi.
How to Install Raspberry Pi VPN on Kodi Jarvis Version 16
The process for installing Raspberry Pi VPN on Kodi Jarvis Version 16 remains the same as for Kodi Krypton Version 17. If you need to install Raspberry Pi VPN, then follow the steps outlined above.
Raspberry Pi Kodi Download
In order to download Kodi on your Raspberry Pi device, you need to download OpenELEC for your respective Raspberry Pi device, while on the other hand you further require to download Rufus.
- You can get OpenELEC for your Raspberry Pi device 1, 2, or 3 Here.
- You can get Rufus software from Here.
- You can get Raspbian OS from Here.
Other Requirements
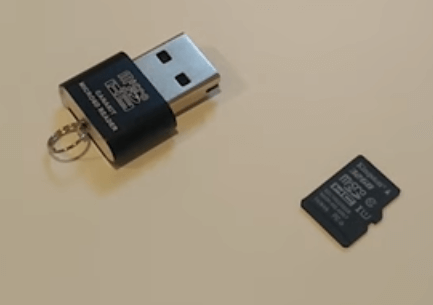
While installing Kodi on Raspberry Pi, you also need to have a micro SD card with an adaptor so that you can easily plug it onto your computer. See this guide for installing kodi on Raspbian Jessie OS.

Raspberry Pi Kodi Alternatives
There are multiple Kodi xbox one alternatives like:
- Kodi on Roku
- Kodi on Xbox One
- Kodi on iPad
- Kodi on Firestick
- Kodi on Windows
- Kodi on Apple TV
- Kodi on Nvidia Shield
To Wrap Things Up
Kodi is the ultimate choice for Raspberry Pi where you can watch tons of media content with ease. In this guide we provided steps on how to install Kodi on Raspberry Pi 1, 2, and 3 with 6 easy steps. The steps for downloading Kodi on Raspberry Pi 2 and 3 are the same, but the step for downloading Kodi on Raspberry Pi First Generation is slightly different. So enjoy Kodi on your Raspberry Pi device.


7 Responses to How to Install Kodi on Raspberry Pi 1, Pi 2, Pi 3 And Raspbian – Easy Steps